Linear workflow theory has been covered extensively pretty much anywhere on the internet. The purpose of this guide is to lay out the basic linear workflow settings for Vray to get started without the need to get too deep into the theory
Output settings
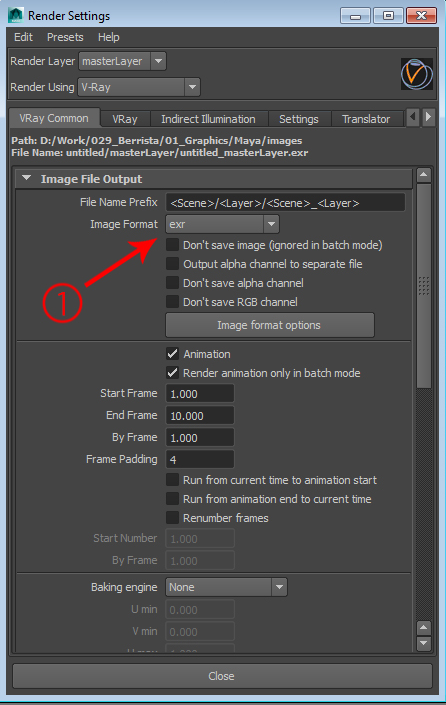
First off, you want to set your image format to a linear image format. I use EXR (16bit half float zip 16 compression)(fig. 1) when comping in After Effects, or multi-channel EXR when comping in a node based compositor like Nuke or Flame. You can also use 16 bit tiffs but EXR has become somewhat the industry standard. You can set your compression and bit rate in the Image Format Options button dialogue.
TIP - When working in a production pipeline, you want to set your file name prefix accordingly. By default it will use scene name; to customize this, you can either type or right click in the file name input and it will give you a popup of available prefixes, which you can enter and then automatically split into folders using forward slashes. I typically use <scene>/<layer>/<scene>_<layer>
This setup has several advantages- It will automatically version up your render output every time you version your scene. It will also automatically split your render layers into separate subfolders, and each render layer will have the scene name attached to it. This is crucial, otherwise you will have passes just named Beauty for example, with no version attached. For example, if our scene was named myscene_v001 and we had a render layer called Beauty, in the images folder we would have a folder called myscene_v001, within that we would have a folder called Beauty, and in that we would have our images labeled myscene_v001_Beauty.
Color space settings
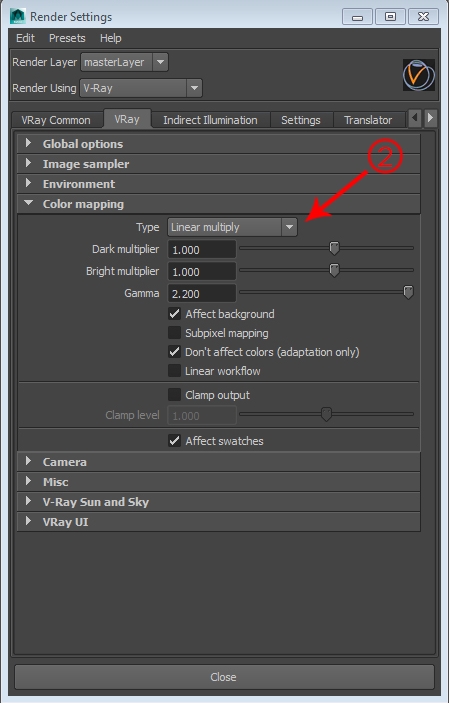
Next, under the Vray Tab > Color mapping, you want to set the type to Linear multiply (fig. 2), set your gamma to 2.2, check affect background, don't affect colors (adaptation only) and affect swatches.
There is some debate over the linear workflow button, checking this will basically gamma correct everything in your scene and is seen as a bit of an outdated workflow. Checking this can be problematic as some things do not require a gamma correction and this can cause render problems down the line. We will discuss what requires gamma correction and what doesn't later.
Gamma correcting textures
Instead of attaching a gamma correct node to every texture, vray has built in functionality to gamma correct your textures.
In the texture file node, under attributes > vray > check the Texture input gamma box. This will automatically apply a 2.2 gamma correction to your texture. That's all!
Gamma correcting swatches
One annoying downside to using a linear workflow is gamma correcting swatches. Every color swatch in vray has to have a .45 gamma correct node attached to it in order to render the correct gamma; if you just pick a color without doing this it will render incorrectly. To do this, just click the input texture box next to your diffuse color and select a gamma correct node. Then change the gamma for all 3 inputs to .454. Now you use the gamma node to control your color swatch.
Slightly annoying, but I will post a script that will automate this process in the next post.
Setting up the Vray Framebuffer
If you aren't already using the Vray framebuffer, you should be. It has, amongst other things, a built in sRGB view mode. Everything we have done thus far is to make everything linear, so if you were to view your render now it would be in linear color space. This will look incorrect, as we are viewing it on an sRGB monitor, so we need to apply an sRGB correction to it.
To enable the vray framebuffer, under the common render globals tab, select use vray VFB. To load the vray framebuffer, select show vray framebuffer. Once it pops up, there will be a button that says sRGB (fig.6). Enable that to view your renders in sRGB color space.
Saving a render preset
Once this is all set up, you can set a render preset so you only have to set this up once. To do that, in the render globals go to presets > Save settings as preset. Then you can load this by going again to presets > load preset. This will only save your settings in the render globals, it will not affect texture gamma or swatch gamma.
That is all there is to it, these settings will render correct linear images every time, and will not require any gamma correct nodes in Nuke or After Effects.
Bonus: What type of files need to be Gamma corrected?
Basically any type of 8-bit image that was not procedurally generated by the computer needs to have gamma correction.
DO gamma correct the following-
- Any kind of 8-bit image, like jpeg, png, targa etc.
- Diffuse maps, bump maps, reflection maps, anything BESIDES normal maps. Normal maps do NOT need to be gamma corrected. You need to gamma correct bump maps especially, if you set them up to be 50% grey and do not gamma correct them you will not have 50% grey as no bump.
- Image planes
- Swatches
DO NOT gamma correct the following-
- HDR, EXR or any 16 or 32 bit images. This includes any kind of images used for High dynamic range lighting
- 16 or 32 bit displacement maps generated by zbrush, mudbox, mari etc
- Vector displacement maps
- Normal maps
- Anything procedurally generated by software, this would include normal maps, 16 bit displacement maps, and others depending on your software
So that's your linear workflow settings in a nutshell, hope this was useful


